This post shows you how to create a simple project in Eclipse using SmartGWT.
PS If you have trouble viewing the images on this post, you are likely behind a firewall which blocks Google Drive content. You can download this page’s PDF file.
This tutorial assume that you are using the following
* Eclipse EE
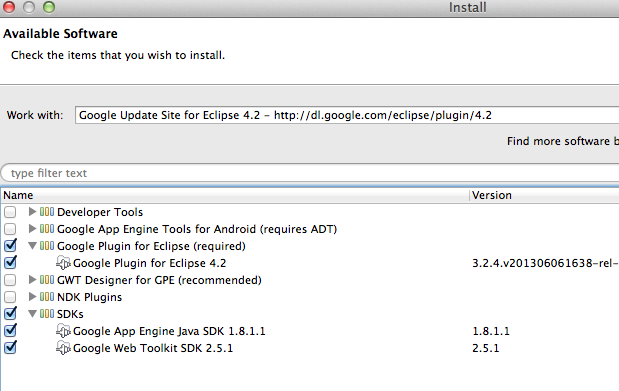
Install GWT Eclipse Plugin by following instruction in http://www.gwtproject.org/download.html
I used the install site: http://dl.google.com/eclipse/plug
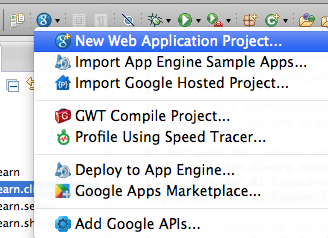
Create a New Web Application Project:
Select

And select “New Web Application Project …â€
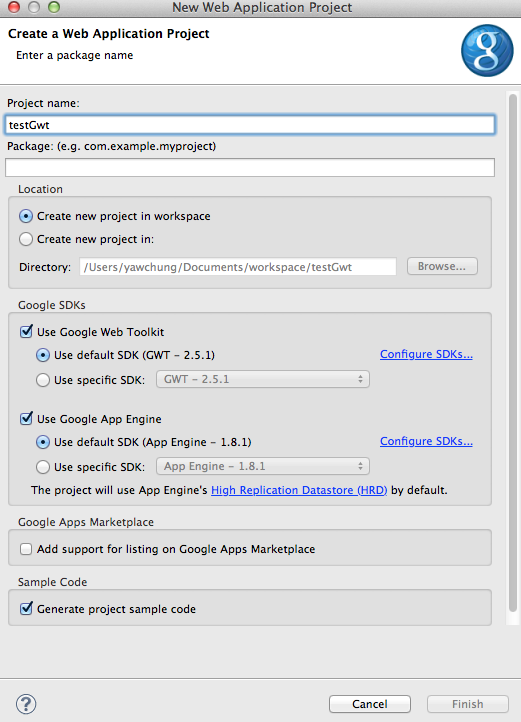
After creating the default Google Web Application Project, configure it for using SmartGWT

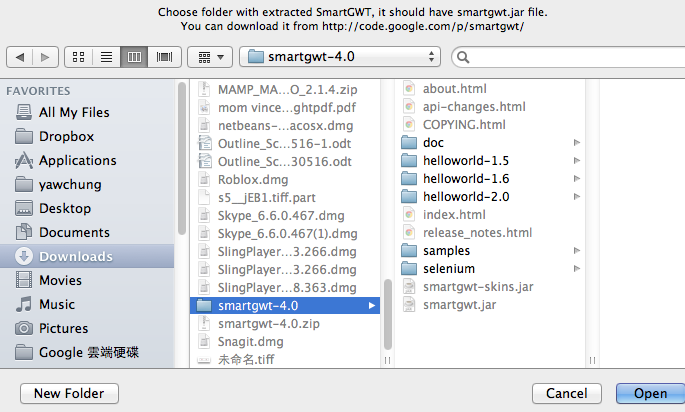
Select to the Smart GWT install directory. To download Smart GWT, go to  http://code.google.com/p/smartgwt/
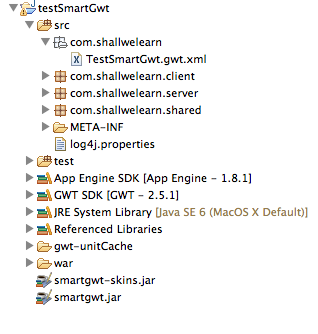
After configuring this project to be SmartGwt, you should see SmartGWT jars got added to the project (smartgwt-skins.jar and smartgwt.jar).
/testSmartGwt/src/com/shallwelearn/TestSmartGwt.gwt.xml
<?xml version=”1.0″ encoding=”UTF-8″?>
<!–
 When updating your version of GWT, you should also update this DTD reference,
 so that your app can take advantage of the latest GWT module capabilities.
–>
<!DOCTYPE module PUBLIC “-//Google Inc.//DTD Google Web Toolkit 2.5.1//EN”
 “http://google-web-toolkit.googlecode.com/svn/tags/2.5.1/distro-source/core/src/gwt-module.dtd”>
<module rename-to=’testsmartgwt’>
<!– Inherit the core Web Toolkit stuff. Â Â Â Â Â Â Â Â Â Â Â Â –>
<inherits name=’com.google.gwt.user.User’/>
<!– Inherit the default GWT style sheet.  You can change    –>
<!– the theme of your GWT application by uncommenting      –>
<!– any one of the following lines. Â Â Â Â Â Â Â Â Â Â Â Â Â Â –>
<inherits name=’com.google.gwt.user.theme.clean.Clean’/>
<inherits name=”com.smartgwt.SmartGwt”/>
 <!– Specify the app entry point class.             –>
<entry-point class=’com.shallwelearn.client.TestSmartGwt’/>
<!– Specify the paths for translatable code           –>
<source path=’client’/>
<source path=’shared’/>
</module>
Next, we need to change the code to use SmartGWT API, instead of the GWT API. Even though you could mix SmartGWT and GWT to an extent, it’s receommended by SmartGWT developers not to do so. For reasons, please go to SmartGWT forum http://forums.smartclient.com/ , and search for “mixing SmartGWT and GWTâ€, and you will get an earful.
/testSmartGwt/war/WEB-INF/web.xml
<?xml version=”1.0″ encoding=”UTF-8″?>
<web-app xmlns:xsi=”http://www.w3.org/2001/XMLSchema-instance”
xsi:schemaLocation=”http://java.sun.com/xml/ns/javaee
       http://java.sun.com/xml/ns/javaee/web-app_2_5.xsd”
version=”2.5″
xmlns=”http://java.sun.com/xml/ns/javaee”>
<!– Servlets –>
<servlet>
<servlet-name>greetServlet</servlet-name>
<servlet-class>com.shallwelearn.server.GreetingServiceImpl</servlet-class>
</servlet>
<servlet-mapping>
<servlet-name>greetServlet</servlet-name>
<url-pattern>/testsmartgwt/greet</url-pattern>
</servlet-mapping>
<!– Default page to serve –>
<welcome-file-list>
<welcome-file>TestSmartGwt.html</welcome-file>
</welcome-file-list>
</web-app>
/testSmartGwt/src/com/shallwelearn/client/TestSmartGwt.java
package com.shallwelearn.client;
import com.google.gwt.core.client.EntryPoint;
import com.smartgwt.client.widgets.IButton;
import com.smartgwt.client.widgets.events.ClickHandler;
import com.smartgwt.client.widgets.events.ClickEvent;
import com.smartgwt.client.util.SC;
/**
 * Entry point classes define <code>onModuleLoad()</code>.
 */
public class TestSmartGwt implements EntryPoint {
/**
         * This is the entry point method.
         */
public void onModuleLoad() {
IButton button = new IButton(“Hello World”);
button.addClickHandler(new ClickHandler() {
                        public void onClick(ClickEvent event) {
SC.say(“Hello World from SmartGWT”);
     }
});
button.draw();
}
}
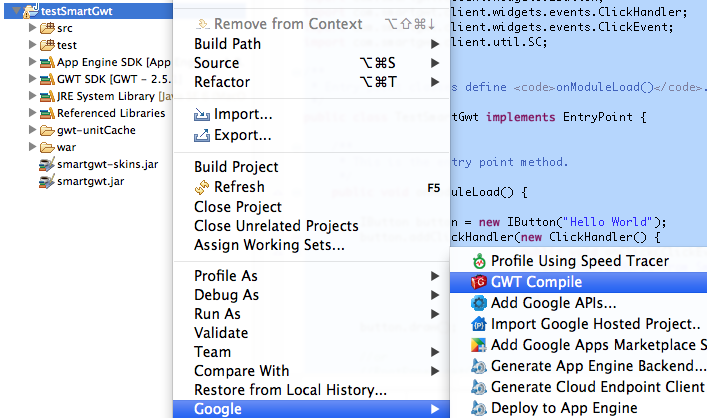
To Build this project. Right-click on testSmartGwt project and select Google->GWT Compile
The GWT Compile dialog should look as followed. Click “Compile†to compile Java code to JavaScript.

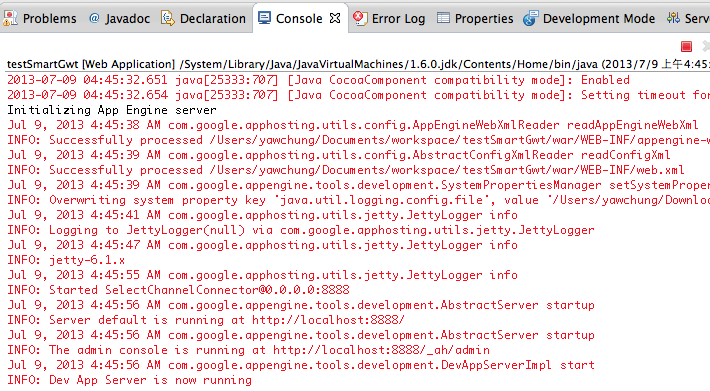
The trace of the GWT compile. If all goes well, it would say Succeeded.

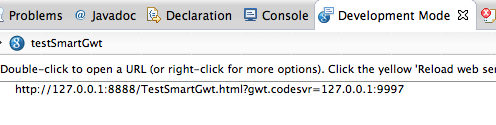
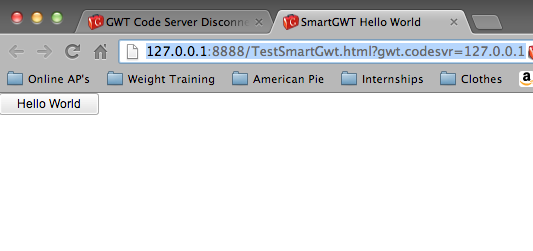
To run on Jetty server, which comes bundled in Eclipse EE. Right-click on


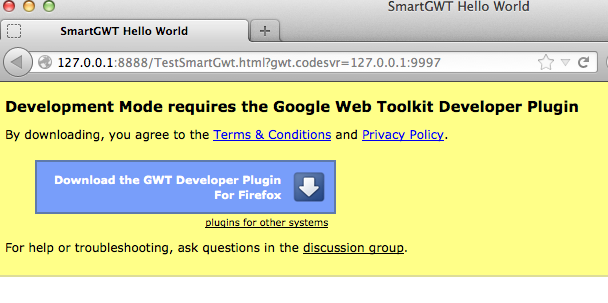
If you see error such as “Development Mode requires the Google Web Toolkit Developer Plugin†(Firefox error shown below), just follow the instruction to install the GWT plugin.
Finally, to terminate the Jetty server, click the red square.
This is my first time pay a visit at here and i am in fact impressed to read all
at single place.
The images aren’t showing up on this tutorial. (Chrome)
Sorry it took me more than a year to get back to you. If you don’t see the images, it’s likely that you are behind a firewall which blocks images saved in Google Drive.
Thanks, I could not test it because the images are gone.
Sorry it took me more than a year to get back to you. If you don’t see the images, it’s likely that you are behind a firewall which blocks images saved in Google Drive.
Thank you so much for this post! I’m a UX/UI guy with some front end chops who would like to figure out how to handle the front end of our website. Do you think it’s possible for front end guys to handle the SmartGWT UI?
Late is better than never…I am finally finding some time to respond to the comments. Of course! Several guys on my team had mostly UI/UX background and they were able to pick up SmartGWT
I see you don’t monetize your blog, don’t waste your traffic,
you can earn additional cash every month because you’ve got high quality content.
If you want to know how to make extra $$$, search for:
Mrdalekjd methods for $$$
I have noticed you don’t monetize your site, don’t waste your traffic, you can earn extra cash every
month because you’ve got high quality content.
If you want to know how to make extra bucks, search for: Mertiso’s tips best adsense alternative
I have checked your website and i have found some duplicate content, that’s why
you don’t rank high in google, but there is a tool that can help you
to create 100% unique articles, search for: Boorfe’s tips unlimited content
I have noticed you don’t monetize your website, don’t waste your traffic, you can earn extra
bucks every month. You can use the best adsense alternative for any type
of website (they approve all websites), for more info simply search in gooogle:
boorfe’s tips monetize your website